Monday, November 23, 2020

NVMe

I've built a Xeon workstation, and had a lot of issues with the NVMe drive not being found by the BIOS. It would take roughly 3 reboots, before the WD SN550 would be found.

I've replaced that drive with a Crucial NVMe drive, and since I did that, the boot issue went away. Unfortunately, the Amazon return period has passed, so now I am test-driving the suspect WD SN550 drive as a secondary drive in a PCIe extension card.

With two drives in my system, I can do some comparative performance tests.

The Crucial P1 M2 2280 1000GB:
The Western Digital SN 550:

I will report back with an assessment of reliability as a non-boot drive, for the SN 550. It's read-performance does seem better than the Crucial drive. As I am using the Crucial as boot and root disk, I have not been able to compare the write performance between then. The Crucial does indeed feel slower.

UPDATE 1: The SN 550 is reliably detected as a 2nd drive by linux.

Compared to a rotating drive, IronWolf NAS TTB (HDD):
Compared to PNY XLR8 CS3030 1TB:
IronWolf 6TB (HDD):
WD Black SN750 with heatsink:
Seagate Barracuda 510:
Samsung 970 EVO Plus:
WD Caviar Blue (HDD):
Crucial P1 on an old Haswell system:
SSD EVO 860:
OCX VERTEX3 has a slow seek:
Kingston SH103S3120G:

Thursday, November 12, 2020

Setting up a new Ubuntu box.

This is for my own benefit... when setting up a new Ubuntu distribution, adjust the following...

  • Choose minimal install, and the create an EFI partition, a Swap partition, and a Root partition.
  • After reboot, pin the terminal to the bar.
  • gsettings set org.gnome.desktop.interface enable-animations false
  • apt-get update ; apt-get dist-upgrade ; apt autoremove
  • Make it accessible: apt-get install openssh-server
  • Booting should not be silent, edit /etc/default/grub
  • Copy over .ssh/ directory from another machine, so that I have my ssh keys.
  • Copy over .vim/ directory from another machine, so that I have my vim setup.
  • Add to .bashrc file: export PKG_CONFIG_PATH=$HOME/lib/pkgconfig:/opt/lib/pkgconfig
  • Add repositories for dbgsym packages.
  • To allow fan control: sudo nvidia-xconfig -a --cool-bits=4
  • apt-get install psensor traceroute imagemagick
  • apt-get install vim git cmake clang-10 libsdl2-dev opengl-4-man-doc
  • apt-get install inkscape gimp wings3d
  • Install CUDA
  • Set git identity: git config --global user.email "EMAIL" ; git config --global user.name "NAME"
  • Get rid of Gnome's indexing by tracker.
  • Create a file /etc/modprobe.d/nsight containing: options nvidia "NVreg_RestrictProfilingToAdminUsers=0"
  • usermod -a -G video bram
  • usermod -a -G dialout bram
  • Add kernel parameter intel_pstate=passive in /boot/grub/grub.cfg file.

Thursday, November 5, 2020

Screen Recording and Ubuntu.

Recording gameplay videos on Ubuntu can be a big frustration. Here are some lessons learned.

WM

Compositing window managers are garbage. Get rid of the default window manager 'Mutter' and go with 'Openbox' instead. GDM3 refuses to launch a different windowmanager, so replace that too, with lightdm. *sigh*

  $ sudo apt-get install lightdm
  $ sudo apt-get install openbox

Log off, select openbox, and log on again. Good riddance to the crapfest called compositing. You don't need it. Eye candy and transparent windows are for noobs.

Simple Screen Recorder

So far, the best results I get with Simple Screen Recorder, but with caveats: The docs say OpenGL recording is best. Well, it most certainly is not. It is choppy, glitchy and unreliable. It also causes OpenGL errors. Instead, record the window. Make sure to select superfast setting, otherwise the encoding will cause hitches in the framerate, especially so when trying to make 60Hz videos.

In the end, I got there, and managed to record gameplay for my video, I made with Openshot:

How Open Can You Make an Open World Game?

This is a one-man's quest on making an Open world game, with a capital-O.

It seems ages ago, that I was playing an Elder Scrolls game. It was big, and it was open. What impressed me most about it was the following:

With a hundred settlements on the map, and dozens of houses per settlement, you canvisit any one those settlements, enter a random house, and check out its book shelves. You could take a book from the shelves, and then, for instance, drop that book underneath a stairwell. Then, after doing all sorts of quests, fighting legions of foes, slaying of dragons, traveling far and wide, you could return to that house. And guess what? That book you dropped, at what seems to be ages ago, is still there under the stairwell.

In short, there is permanence in the world. A permanence of detail. (I remember reading that the developers did put some limits on that to cut down on the size of saved games, but in essence it did achieve this permanence.)

I thought about how to push this openness even further. What is not possible in that particular game, but would push the amount of influence a player has on a game world?

Digging

In real life, I can dig a ditch in my yard, and even if I leave the country for a year, that ditch will still be there when I return to the yard. Heck, even if a ditch gets filled in by erosion, or human interference, the traces of a ditch will be there two millennia later, when Time Team archaeologists excavate it looking for a Roman villa.

I don't think there are many games that let you dig a hole anywhere in the world, and have that persist. Although, thinking about it, Minecraft would qualify.

Considering that my indie game is a one man effort, I can't create a huge authored game world. Which means that I will, like Minecraft, rely on procedural generation of my universe. But, after that procedural generation, I want the player to be able to dig anywhere, and everywhere.

Enter The Planetary Ring

As a setting for my game, I have chosen space. More specifically, a whole bunch of rocks orbiting a planet. Procedural generation using 3D noise fields are well suited to create amorphous blobs in space. There is of course the whole problem of a 10,000 bowls of oatmeal, but still, it is easy to create a scene in which the player will experience the vastness of space.

18 billion billion

A side note here: even though the world is presented as a ring of rocks around a planet, I decided to make this ring infinite: As the player hops from one rock to the next, I keep generating new ones at the far end, causing the player never to reach the other side of the planet. With a 64-bit seed for each rock, 18 billion billion different rocks can be generated. This guarantees the player will never see the same rock twice, regardless how long they travel for.

Every planetoid in the game approaches a billion cubic feet of rock. Each and every cubic foot in there, can be dug by the player. This enables the "Tunnel To China" where you can dig to the other end of the planetoid, for instance.

To add permanence to the player's influence on this world, we have to store the modifications by the player of course. Only that terrain that was modified by the player is stored to disk, leaving the virgin grounds represented by the proc-gen algorithm alone. So, even though the game world is infinite, the amount of digging is limited by the disk space of the player's computer.

Generation

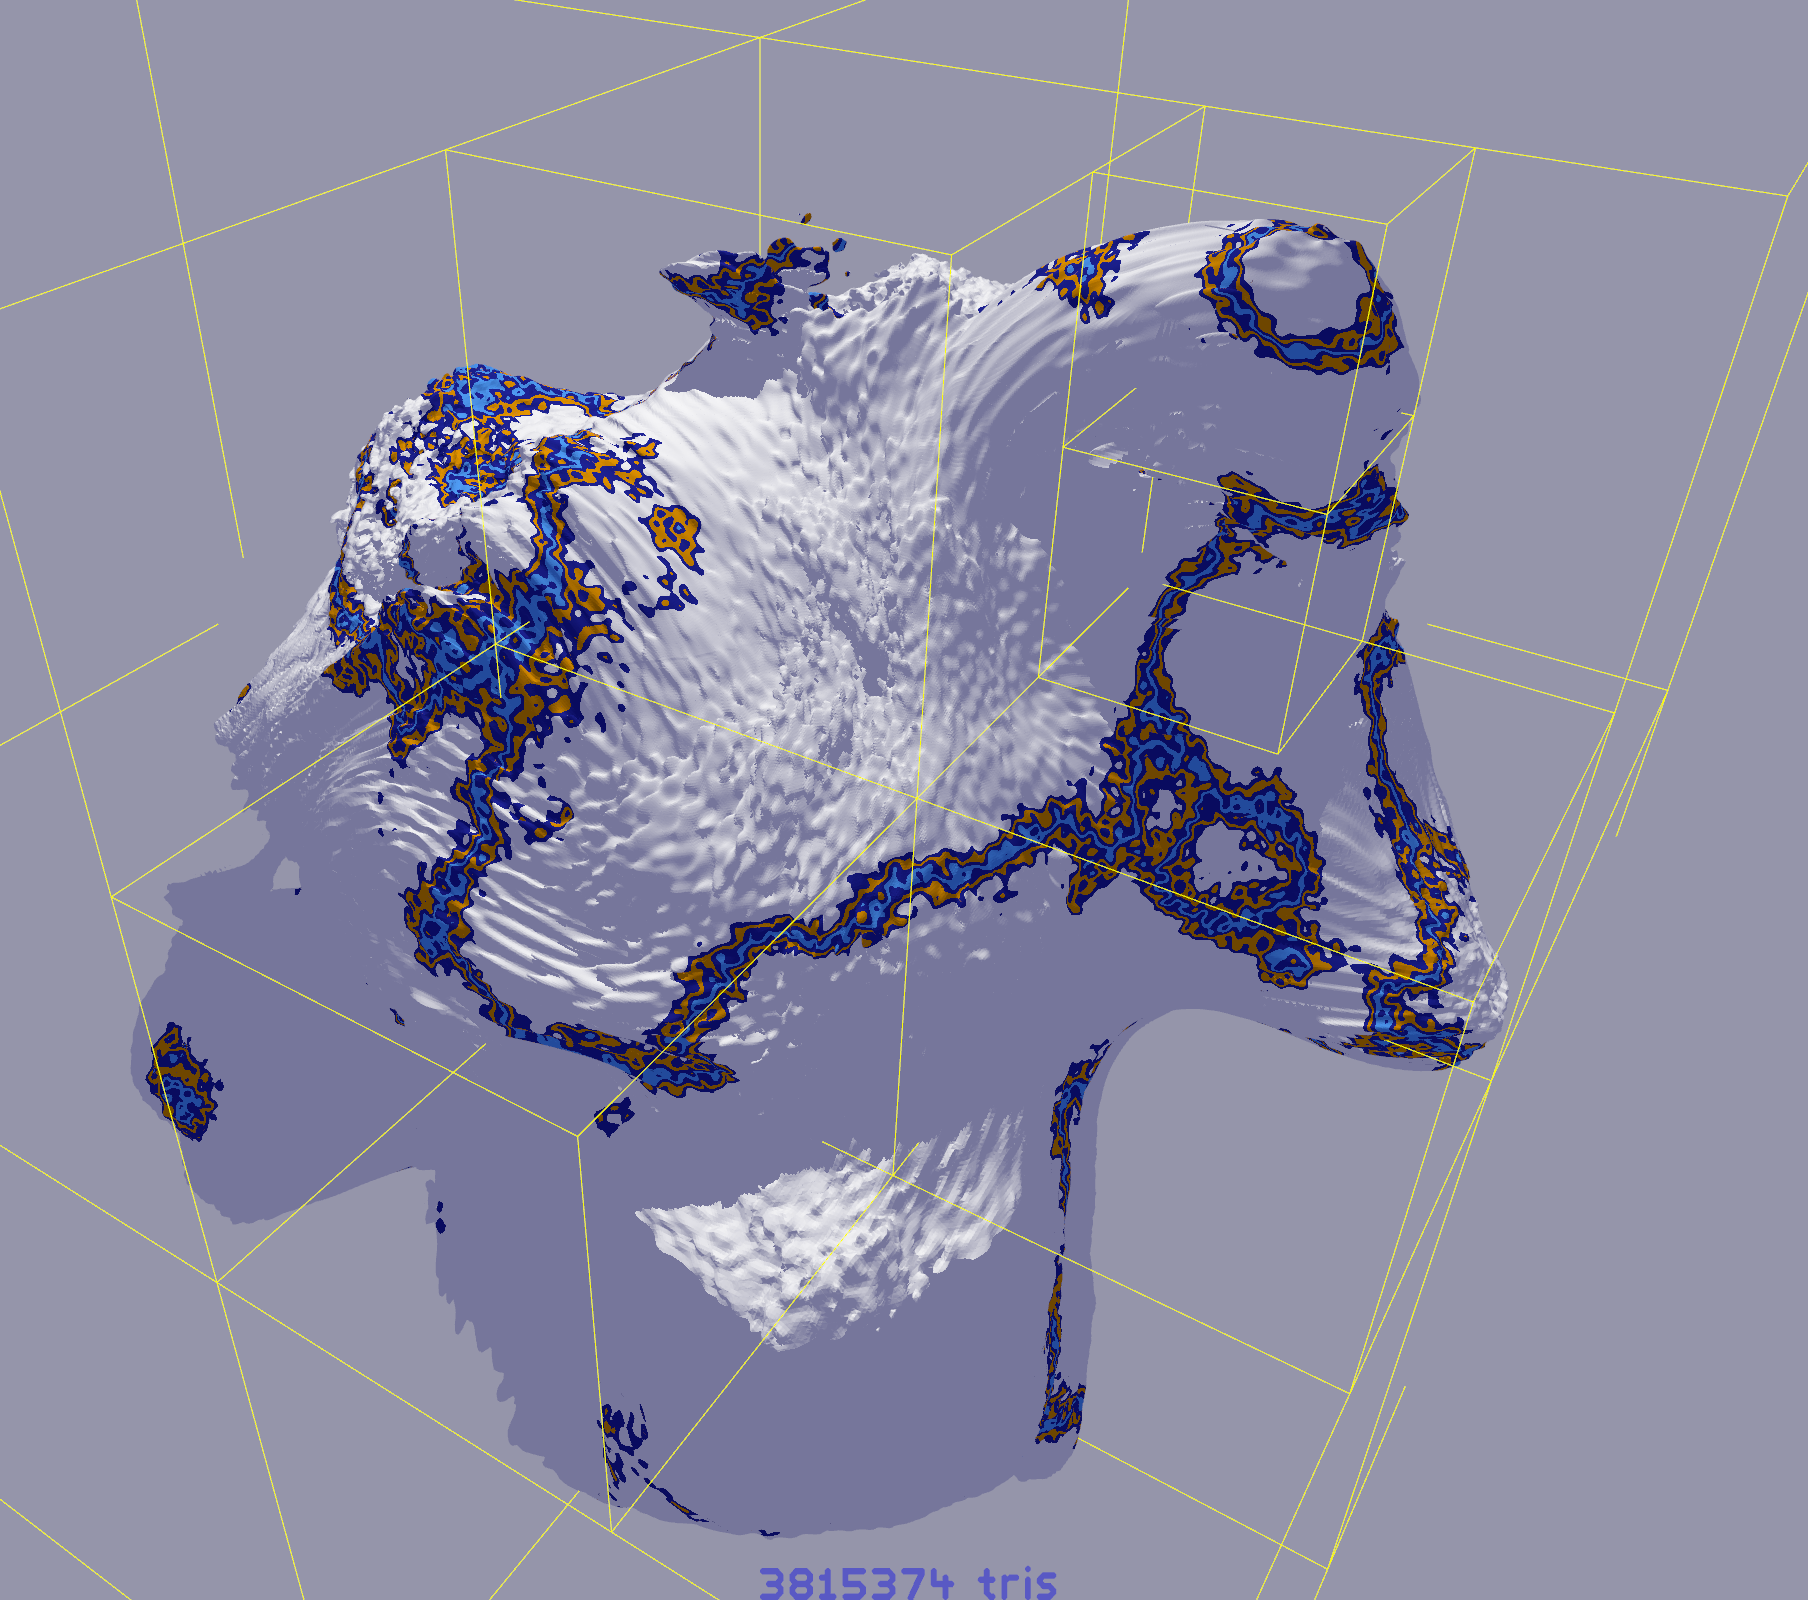
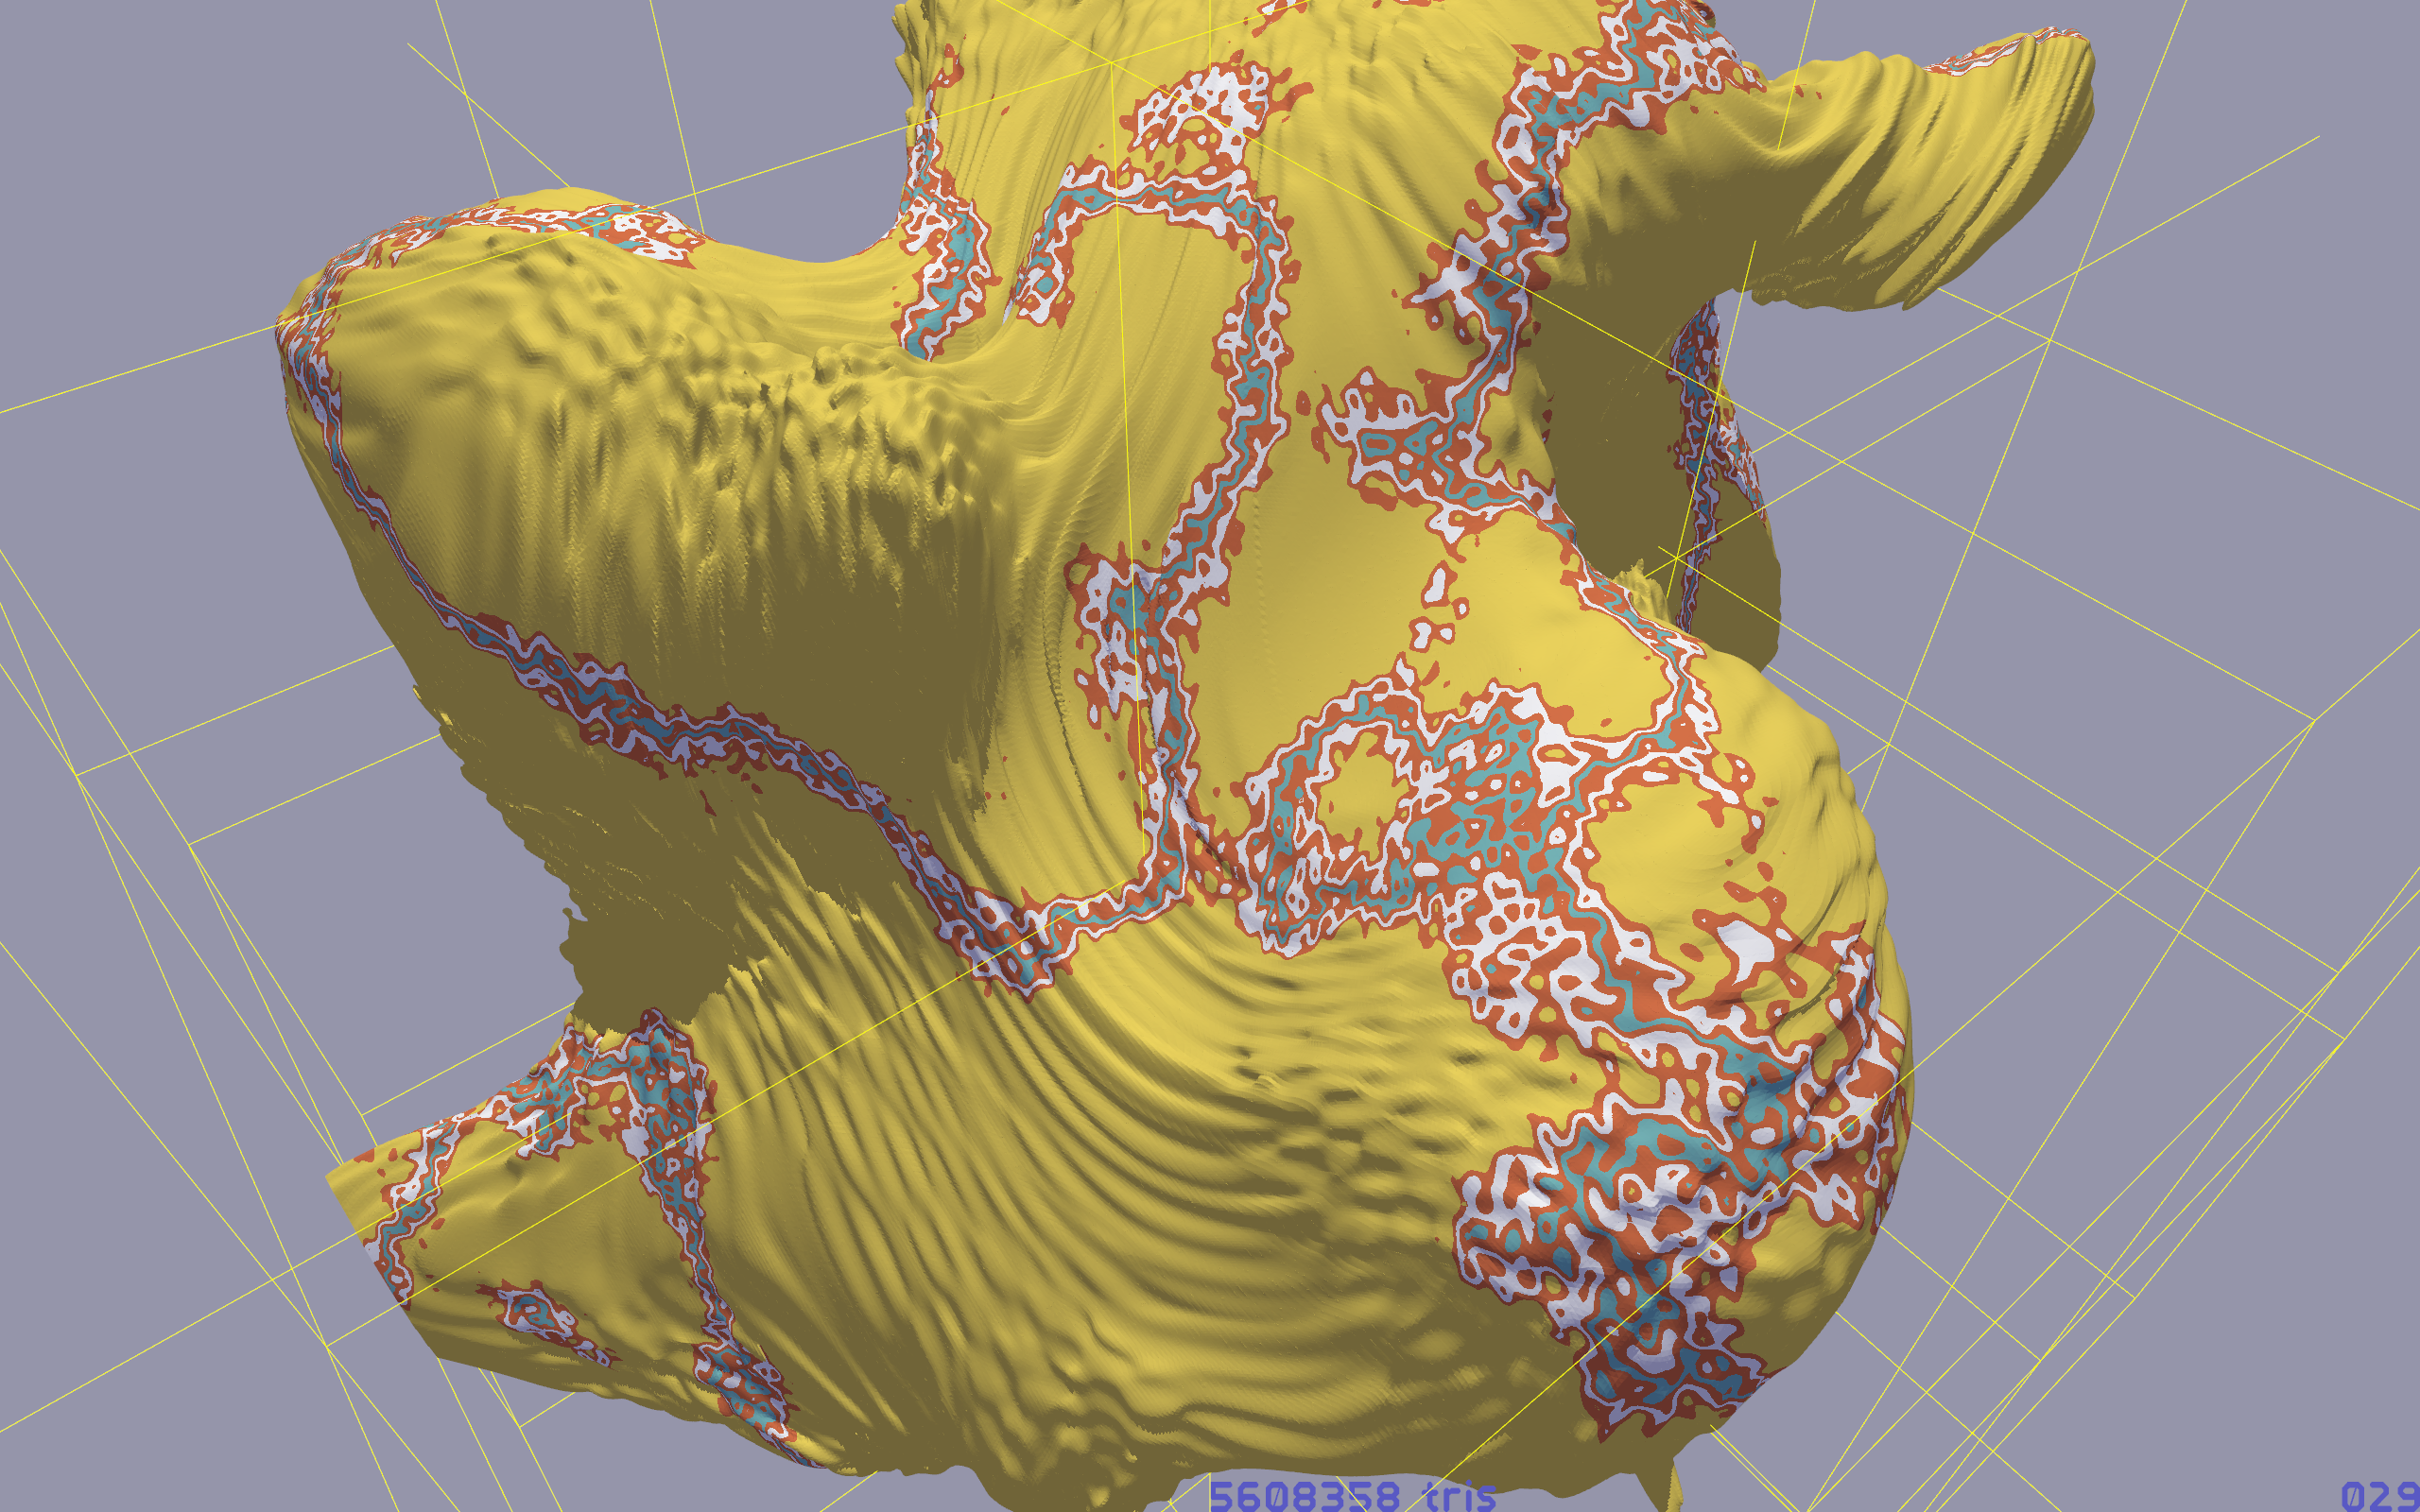
About the generation of the space rocks: they are defined by two large 3D noise fields. One field defines the density, and by using the Marching Cubes algorithm, a surface is generated to define the shape of the object. The other field defines the material type. This enables me to define veins of mineral ore inside the object.

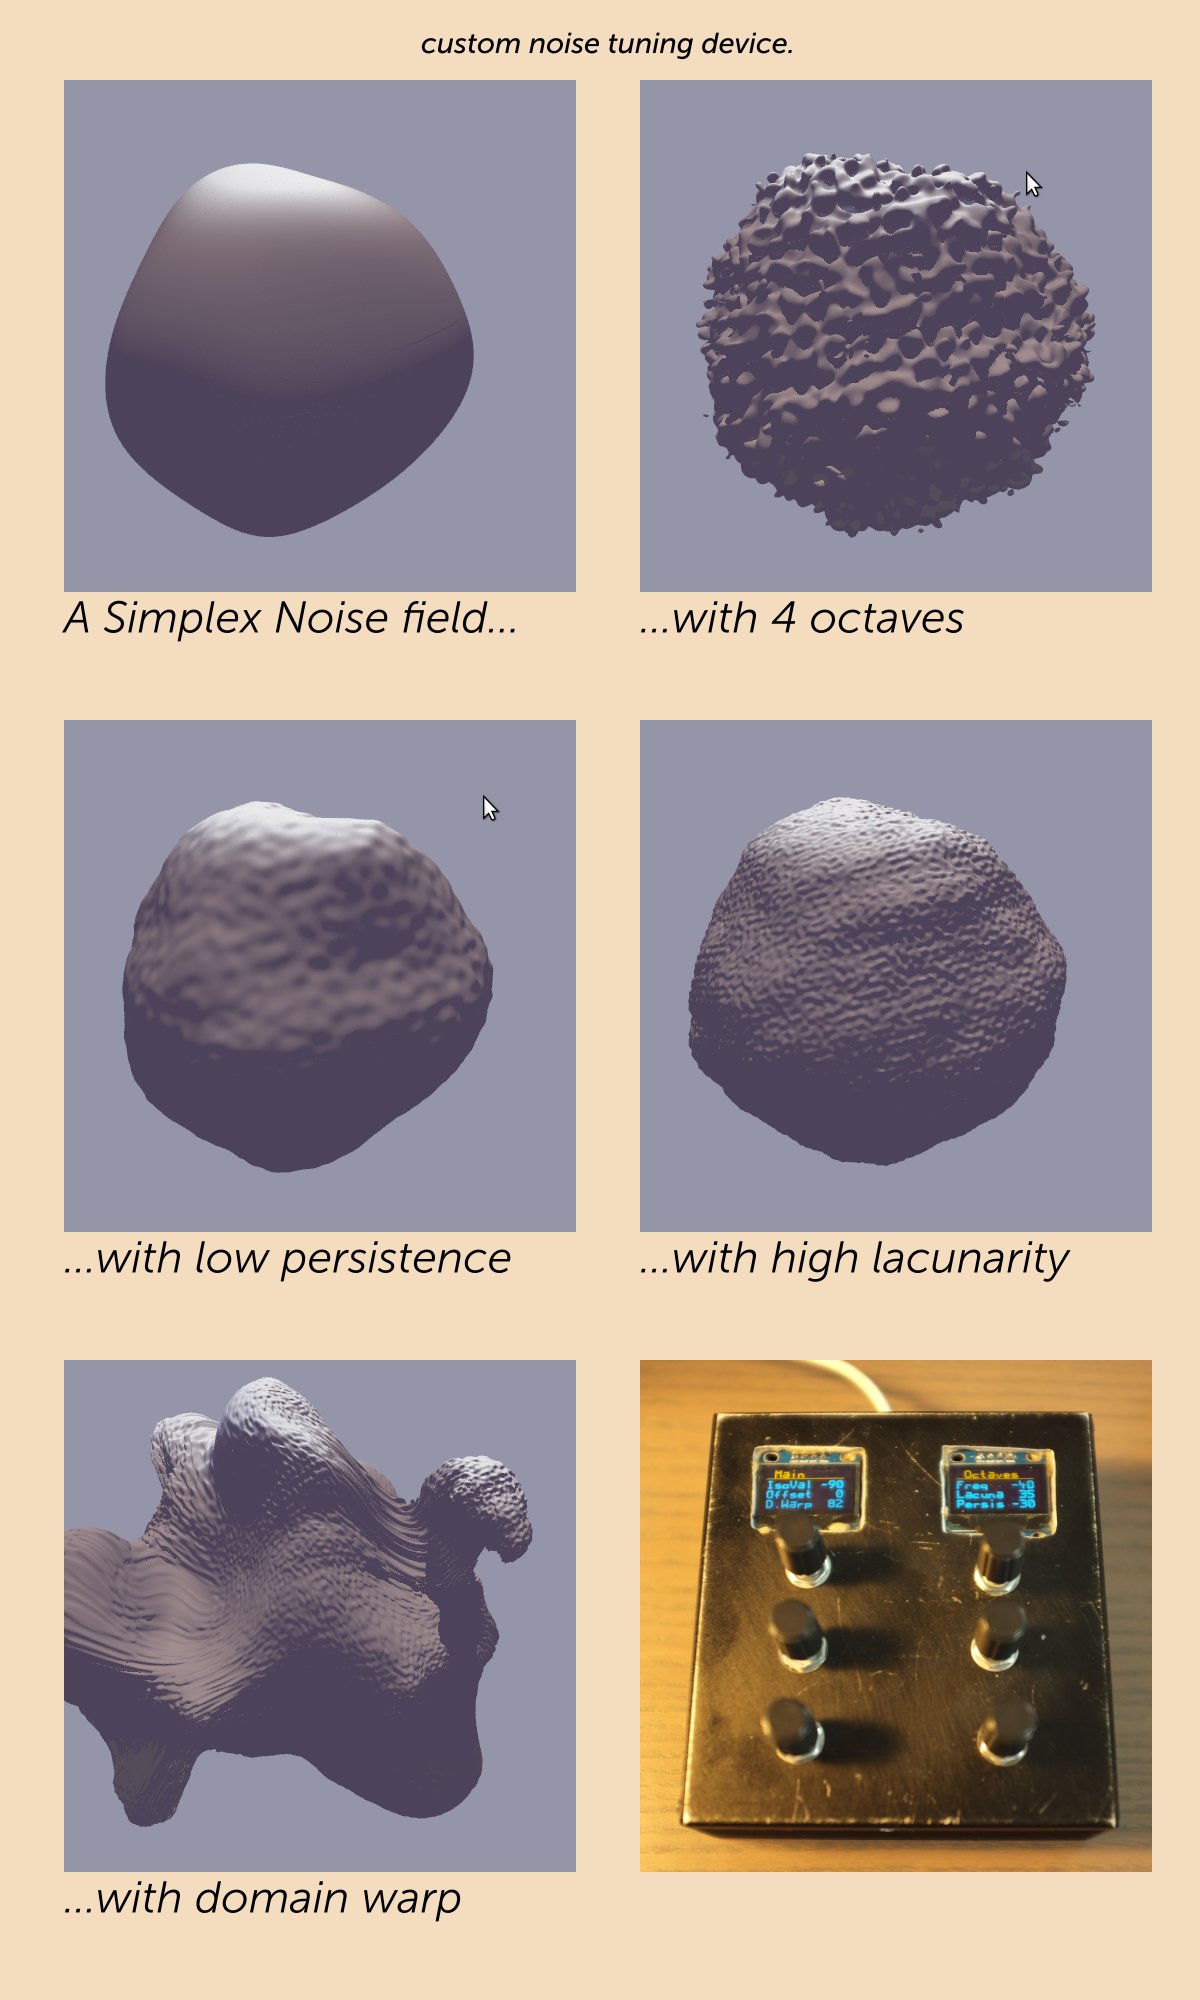
Standard functions, like Open Simplex Noise, will create smooth terrains and never show steep cliffs. To add cliffs and ragged shapes, we can employ a technique called domain warping: Instead of sampling the noise function with straight x/y/z grid locations, the sample positions are perturbed with another noise value. See Sean Murray's GDC presentation on noise for more info on this.

Results So Far

So, what are the results so far? Well, that little space rover can dig holes in any rock, fly for ages to other parts of the world, and when it returns to the original space rock, those holes are still there. Permanence achieved! Next up: gameplay.

Gameplay is of course the part that matters, but it helps if you can set it in a world where the player has a strong sense of agency. Go anywhere, and leave your permanent mark.

Tuesday, October 20, 2020

Exit vi less often.

I am from the school of thought that recognizes the fact that typing is not the bottleneck for software engineering. So I am perfectly fine to use my command line, my vi and my Makefile. My peers consider me a weirdo for not using an IDE. Additionally, a powerful debugger is not a substitute for thought either, as expertly expressed by Rob Pike.

Not using an IDE means a more direct control over what happens. No schemas, no vcproj xml, no burried GUI fields, no property sheets. Or as I call it: bliss!

But fair enough, I spend a non trivial amount of time opening and closing vi, because I need to navigate my code. What could we do to reduce that?

Remember your place

First off, it helps if vim (I'll use vim and vi interchangably) remembers where you cursor was, last time you edited a file. For this, we have the following snippet in .vim/vimrc configuration file:

if has("autocmd")
  au BufReadPost * if line("'\"") > 0 && line("'\"") <= line("$") | exe "normal! g`\"" | endif
endif
	

Toggle to/from header file

Next up: we want to be able to quickly toggle between header file and implementation file. Because I mix up C and C++, I unfortunately have three instead of two shortcuts for that. \oh to open the header, \oc to open the .c file, and \oC to open the .cpp file. You can have those too, with this in the configuration:

nnoremap oc :e %<.c
nnoremap oC :e %<.cpp
nnoremap oh :e %<.h

:set timeoutlen=2000
  

Note: The time out is added, so that you have some time between pressing the leader key (backslash) and the command.

Jump to declaration

But how do I quickly jump to the declaration of a particular function? Well, there is a mechanism for that too, called include jump. The vim editor can parse your include statements, so that with the :ij foo command, you can open up the header that declares the foo() function. But you do need to point vim to the path of files to try, which I do with:

set path=.,**

Jump to another file, regardless of location

If you just want to jump to a named file, but don't want to be typing full paths, you can use the :find bar.cpp syntax.

So there we have it: less quiting and starting vim. For completeness, my entire .vim/vimrc configuration is below:

filetype plugin on

set path=.,**

if has("autocmd")
  au BufReadPost * if line("'\"") > 0 && line("'\"") <= line("$") | exe "normal! g`\"" | endif
endif

set wildignore=*.d,*.o

nnoremap oc :e %<.c
nnoremap oC :e %<.cpp
nnoremap oh :e %<.h

:set timeoutlen=2000

autocmd Filetype python setlocal noexpandtab tabstop=8 shiftwidth=8 softtabstop=8


Tuesday, September 29, 2020

7 Years

Amazingly, the PC that I built has lasted me a whole 7 years. It is still a fine PC. It had one or two graphics card upgrades, and some extra RAM, but other than that, a Haswell CPU is still a perfectly fine workhorse.

I would have continued using that PC for even longer, if it were not for two things: One: I got curious about AVX-512 and what I could do with that. Two: my daughter showed interest in PC tech, so I thought this would be a good educational opportunity, so I let her help me build it.

Annoyingly, many, if not most, of Intel's new processors still do not come with AVX512. They keep introducing CPUs that don't have it. Why? However, there are some interesting routes to take, if you want AVX512. One of them is to get this obscure little appliance: Intel Crimson Canyon NUC. But going back to just 2 cores? Eh....

Another interesting route to take to AVX512 is to buy what corporate and pro users no longer want: old Xeons. Take, e.g a professional Mac user that bought the 2017 Mac Pro with 8 cores, starting at the $4999,- price. Some time later, this pro-user needs to have a faster Mac, so they upgrade the Xeon CPU. What happens to that old W-2140B Xeon that was replaced? It gets dumped on eBay for $200 or so! Similarly, corporate users dump high end Supermicro Xeon boards there too.

So why not snap those up, and build our own Xeon based workstation? That was the plan, and that was what happened. I am now the proud owner of a used PC, suited to replace my aging Haswell.

Some things I learned along the way:
  • Some fans (looking at you, Noctua) do not reliably report the RPM, so the motherboard can sometimes read a '0' value, causing it to panic, and put all fans on full blast. So out with the Noctua, in with an aging repurposed Corsair fan, yanked from a broken watercooling kit.
  • I bought a really cheap audio card from Amazon, thinking it would be fine. But the System Event Log (SEL) of Supermicro actually showed that there were parity errors on the PCIexpress bus. This went away after yanking out the sound card.
  • Initially this system ran with an antique GTX750Ti. As a developer I need to test with a variety of GPUs to improve my code, so I thought I should replace it with a Radeon. The quality of the AMD GPU PRO drivers being what it is: the resulting stress is just not worth it. That GPU went back to Amazon.
  • The InWin 301 MicroATX case has two fan-mounts on the front of the case, yet a sealed front with no air inlet. So you end up using the bottom fan mounts, blocking a PCIExpress slot with it. It doesn't seem to be a smart design.
  • Even though the CPU and Motherboard can be purchased at discounted prices on eBay, the ECC RAM that is needed is still full price.
  • I designed the system for low power usage. So a PSU rated at 550W and 80+ GOLD, seemed good enough. In hindsight, more head room would be better: I read that PSUs perform best at their 50% level or so.
  • It is quite interesting to be able to manage your system on a side-channel. With IPMI you can manage many aspects of your system.
  • To set sensor limits, use ipmitool sensor thresh FAN1 lower 100 200 300 and ipmitool sensor thresh FAN1 upper 3000 4000 5000.
  • Block the power management mode C6 in the BIOS. If I don't, my OS keeps getting small pauses in which the PC seems frozen: not even keyboard strokes make it through. UPDATE: This may have been incorrect. It looks like the pauses were caused by slow writes of the Crucial P1 NVMe drive.
  • My Western Digital NVMe storage (BLUE) is mostly not found by BIOS during boot. I need at least 3 reboots before it gets found once. After replacing with NVMe drive by Crucial, that problem went away. Faulty WD unit? Or just not compatible? It seems to be a common complaint by Amazon buyers of the WD NVMe storage.

Wednesday, September 23, 2020

Solving Collisions

I've been developing games for a long time now, but solving collisions remains a hairy subject. The Physics Engine I have used the most is OpenDE. It worked well for Little Crane. But the fact that OpenDE considers a triangle mesh as a generic 'triangle soup' as opposed to a closed surface, tends to get me into trouble. Consider the figure, below, where a wheel intersects the terrain.

Here, we expect triangles A and B to cause the wheel to be pushed out of the terrain. And we expect this correction in the direction of the triangle normals for A and B. Unfortunately, this is not always what happens. As OpenDE considers every triangle individually, it will report collisions on internal edges of the mesh, and tries to correct them with collision normals that lie in the triangle plane, as depicted below.

To make matters worse, other edges can cause collision constraints that push in the completely opposite direction, causing the wheel to get stuck in the terrain.

So what are the options here? One approach is to ignore all collision contacts with collision normals that do not align with the triangle normals. This can cause sinking into the terrain.

Another approach is to correct all reported collision normals, and override them with the triangle normals. This seems to work reasonably well, until you hit a 'thin' part of the terrain, where the wheel goes inside the terrain, and emerges from the other side, out of another triangle, as depicted below.

Blindly using the triangle normals as collision normals leads to bad things here: The wheel is simulateously restricted to go only up and to go only down, meaning the solver will freeze the wheel in place! To solve this, we need to somehow detect one collision as being the first, and ignore the other one.

At the end of the day, filtering the contact points that your physics engine gives you is a non-trivial problem. Limiting the maximum velocities, and using tiny timesteps go a long way, but even then you can get into trouble. If you can, building your terrain out of convex shapes only will save you a lot of troubles, as there is always a well defined inside and outside, making the collision resolution simpler. With generic triangle meshes, you have to be careful.

Saturday, September 19, 2020

OpenCL on a Radeon

So, the game I am currently developing was written around Procedural Generation of terrain, using the CUDA language. CUDA is great for doing GPGPU (General Purpose computing on a Graphics Processor.) It's well thought-out, and straightforward to use. It only has one drawback: it will only run on nVidia GPUs.

If I am to sell my game on Steam, it will have to run on AMD GPUs as well. So that means supporting something besides CUDA. The most portable way of doing GPGPU, is GLSL, but that is very cumbersome, as you need textures to get your data out, for starters. The next most portable way would be OpenCL.

At the time of porting from CUDA to OpenCL, I did not have an AMD GPU, so I did the OpenCL port using my nVidia GPU. OpenCL is a little rougher around the edges than CUDA, but the port did work fine, and ran at the same speed too. So it was time to test it on AMD hardware. As my freshly built Xeon Workstation reused a very aging GTX 750 Ti, it was upgrade time anyway, so out with the GTX 750 Ti, and in with the Radeon RX 5500 XT.

The last time I used a Radeon, the linux drivers for it were a mess, and worse, left your Ubuntu install in a mess too, by using it. In 2020, things are easier, and Ubuntu supports it out-of-the-box with an Open Source driver. However, that Open Source driver has limited capabilities. For starters, it comes without OpenCL, the sole reason why I purchased the Radeon.

So out with the Open Source driver, and in with the proprietary driver. These are the steps I had to take to install OpenCL support for AMD on Ubuntu:

  • Download the proprietary driver from AMD's website.
  • Unpack the archive.
  • The driver comes in two flavours: consumer and pro. You need the pro version.
  • Install as root with: ./amdgpu-pro-install
  • # dpkg -i opencl-amdgpu-pro-comgr_20.30-1109583_amd64.deb
  • # dpkg -i opencl-amdgpu-pro-icd_20.30-1109583_amd64.deb
And now, I can run my OpenCL code:
    OpenCL 2.1 AMD-APP (3143.9) AMD Accelerated Parallel Processing Advanced Micro Devices, Inc. has 1 devices:
    gfx1012 gfx1012 with [11 units] localmem=65536 globalmem=8573157376 dims=3(1024x1024x1024) max workgrp sz 256
  
I am not sure why it says [11 units] though, as Wikipedia lists the RX 5500 XT as having 22 cores. Hopefully I didn't get scammed with the hardware.

So on Linux, at least, my code now works both on nVidia and AMD, and I can use either CUDA or OpenCL to generate worlds from Open Simplex Noise, like shown below. TODO: Windows port.

Thursday, May 14, 2020

A Random Direction.

A naive way of generating a random direction d(x,y,z) would to take random values for x,y,z and then normalize the resulting vector d. But this will lead to a skewed distribution where too many samples fall in the "cube corners" directions.

A proper way to generate a random direction d(x,y,z) is to do the same, but add rejection-sampling.

  • If the resulting vector has length < 1, then normalize the vector, and use it.
  • If the resulting vector is longer, then reject it, and try again.

The downsides of the proper method are:

  • It is slower.
  • Freak occurrences of having to retry many times.
  • It has branch instructions in it.

I want the fastest possible, 8x SIMD way of generating random vectors. That means, no branching. And that got me thinking about a direction generator that is fast, but less skewed than the naive way. We would tolerate a little bias at the benefit of speed.

An approach I came up with: just generate two sets of coordinates, yielding two candidates. Use the candidate with the shortest length. Picking that candidate can be achieved without any branching, by just using the _mm256_blendv_ps intrinsic.

In pseudo code:

// 8-way vector for the candidates a:
__m256 cand_ax = [random values -1..1]
__m256 cand_bx = [random values -1..1]
__m256 cand_cx = [random values -1..1]
// get lengths for candidates in a and b.
__m256 len_a = length_8way( cand_ax, cand_ay, cand_az );
__m256 len_b = length_8way( cand_bx, cand_by, cand_bz );
// pick the shortest candidates in each lane.
__m256 a_is_shorter = _mm256_cmp_ps( len_a, len_b, _CMP_LE_OS );
__m256 cand_x = _mm256_blend_ps( cand_bx, cand_az, a_is_shorter );
__m256 cand_y = _mm256_blend_ps( cand_by, cand_ay, a_is_shorter );
__m256 cand_z = _mm256_blend_ps( cand_bz, cand_az, a_is_shorter );
__m256 len    = _mm256_blend_ps( len_a, len_b, a_is_shorter );
// normalize
__m256 ilen = _mm256_rcp_ps(len);
__m256 x = _mm256_mul_ps( cand_x, ilen );
__m256 y = _mm256_mul_ps( cand_y, ilen );
__m256 z = _mm256_mul_ps( cand_z, ilen );

What is this all good for? You can generate noise fields with random gradients and not having to resort to lookup tables. No pesky gathers either! Just create the gradient on-the-fly, each time you sample the field. There is no memory bottle neck, it is all plain computing, without any branching. Added bonus: no wrap-around of the field due to limited size of lookup table.

Postscriptum
While implementing, I noticed that I forgot something: when sampling the field, I need to construct the random directions at 8 gridpoints, so it will be a lot slower than a table lookup, unfortunately. Oh well.