Friday, December 15, 2017

Too late for the modern Gold Rush?

Quick, name the one technology that is hotter that Virtual Reality or Machine Learning today. Yep... the hottest thing right now is crypto currency. But did you miss out on the gravy train?

Well, judging from the dizzying levels of the two heavy weights in the crypto world, Bitcoin and Ethereum you could think so. At the time of writing, the price of bitcoin went from ¢24 to $17666,- in 8 years, which is roughly a factor 74,000. It's nigh impossible for bitcoin to repeat that in the next eight years, as there is no room for a $1.3B bitcoin.

Bitcoin got its position as top dog by virtue of being first on the scene. Ethereum got there by the strength of its features, as its blockchain offers a mechanism to write distributed applications and write smart contracts. It is vastly more versatile and more utilitarian than Bitcoin will ever be. For instance, you can use it to implement a cross-breeding, trading platform for virtual kitties with guaranteed pedigree. Sure, it's silly, but it does allow for, among other things, creating cryptographically secured scarce virtual objects.

So Ethereum for the win, then? Well, maybe not. Because of the meteoric rise in the price of Ether (the coin for Ethereum) developers of distributed apps may think twice about running their code on the Ethereum Virtual Machine. When an app is running, it is consuming precious gas. The the price for this gas will quickly become prohibitively expensive.

So if we discount Bitcoin and Ethereum as viable candidates for getting in late, what's left? With over a 1000 to chose from, is there one with a bright future, capable of rising to the top and displacing both Bitcoin and Ethereum? Spoiler: yes there is.

There is an interesting newcomer by the name "NEO." I've seen it described as "China's Ether." I came across it reading a thread about Ethereum killers.

So from what I've been able to ascertain, is that the NEO coin is not mined. If you want NEO, you have to buy it. However, the nice thing about NEO is that as you hold it in your crypto wallet, it generates GAS. Yep, the GAS that is used for running the distributed apps similarly, as Ethereum executes apps. An interesting aspect, right there: gas gets generated by the coins, which means you do not have to spend your precious and rapidly appreciating crypto coin to use the Virtual Machine.

Another possible contender from the aforementioned thread is EOS, by the way. A commenter described it as: "If bitcoin is currency, and ethereum is gas, EOS is land". So that may be worth looking into.

So for the sake of argument, let's say we want to hedge out bets, and get some of those dividend yielding NEO coins. How would you purchase them? Well, they are best purchased using another crypto coin like Bitcoin or Ether. If you don't have those, I suggest you head over to the nearest bitcoin ATM in your city.

With bitcoins in your wallet, it is now time to purchase NEO on an exchange. I recommend Binance (referral link) which has been excellent for me. It has some amazing advantages that other exchanges do not have:

  • No verification needed for below 2btc withdrawals.
  • After signing up you can fund and trade immediately.
  • No fee for withdrawal of NEO.
  • Great trading interface.
  • Easy to use.
  • Based in stable Japan/HongKong without much government interference.

I personally learned this too late, but you do not want to end up with fractional NEO coins. Buying 10.0 or 10.01 NEO is fine. But if you end up with 10.99 NEO, then you can only transfer out the whole coins, and have a less useful 0.99 NEO left over.

With the NEO coins in your Binance account, you can withdraw those for free to a wallet that you created yourself, on your own computer. I recommend the Neon Wallet. Before you withdraw from Binance to your own wallet, make absolutely sure you printed out the private key of your newly created wallet, on paper. And store it in a safe place. Lose your key, and you will lose your coins.

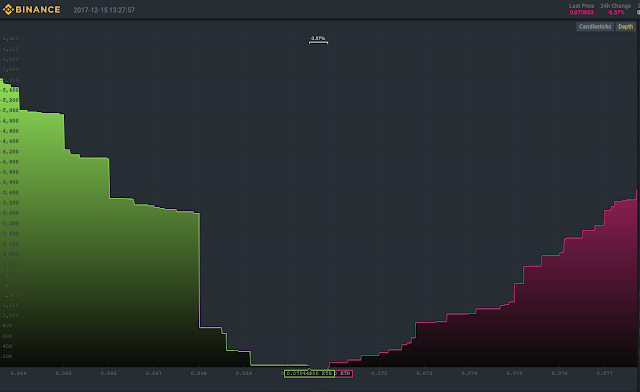
Let me conclude by showing Binance's nifty graph that in real time shows you the volume of buyers and sellers at all price points.
Sunday, November 5, 2017

Profiling on Linux

Speaking of profiling, I wrote an inline profiler for multi threaded Linux apps called ThreadTracer. It's quite good, as it records both wall clock time and cpu time. And on top of that, it also keeps track of pre-empted threads and voluntary context switches.

It's a fine tool, making use of Google Chrome's tracing capability to view the measurements. But for the really low level, micro-sized measurements, we need an additional tool. And this tool is the linux perf tool.

Instead of using perf directly, I found that using the ocperf.py wrapper from PMU-Tools to be a much better option. It has proven to be more reliable for me. You can make it sample your program to see where the cycles are spent. I use the following command line:

$ ocperf.py record -e cpu-cycles:pp --call-graph=dwarf ./bench
$ ocperf.py report -g graph,0.25,caller

In addition to the perf wrapper, it also comes with a great overall analysis tool called toplvl.py which gives you a quick insight into potential issues. Start at level 1 (-l1) and drill your way down to more specific issues, using:

$ toplev.py --long-desc -l1 ./bench

Friday, October 27, 2017

Pitting Profilers against each other.

In the past, I have been using Remotery, an in-app profiler. I recently became aware of Minitrace, a similar app. So I decided to compare results.

The good news is that when my ray tracer is working in single-threaded mode, the results are in agreement. 6ms or so is spent on uploading the image as texture to OpenGL. The rest of the time is spent rendering scanlines.

Minitrace:
Remotery:

I can also run my app in multi-threaded mode. The scanlines are then rendered in 100 work batches. The batches are processed by four worker threads, that are alive during the lifetime of the app.

Minitrace:
Remotery:

The Minitrace run shows that the worker threads were fully busy during the generation of the image. Sometimes, I see a chunk that take a lot more time (> x10) than normal, which made me doubt the measurement. This was the reason I decided to compare to Remotery. However, now I no longer think this is a bad measurement. One of the worker-threads probably got pre-empted by the OS or something.

The Remotery run, on the other hand, seems to be missing data? Could it be a race-condition between worker threads trying to record events? I'll be creating a github issue, but wrote this blog post first, so that the images are hosted.

OS: 64bit Ubuntu Linux.
CPU: Intel(R) Core(TM) i5-4570 CPU @ 3.20GHz
Both Minitrace and Remotery latest version from github as of oct27, 2017.

Thursday, October 26, 2017

sRGB Colour Space - Part Deux.

In part one, I described what you need to do after simulating light before you can show it on a monitor. You need to brighten it by going from linear colour space to sRGB colour space.

Here I talk about how to avoid polluting your calculations with non-linear data. Light intensities can be added or multiplied. But sRGB values cannot. As Tom Forsyth puts it: just as you would not add two zip files together, you would also not add sRGB values.

If you were to take a photograph of a certain material, the image from the camera will typically be in the sRGB colour space. If you want to render a 3D object that has this texture applied to it, then for the lighting calculations you need to get a texel in the linear colour space.

Fortunately, OpenGL can help you out here. If you sample from an sRGB encoded texture, there will be an automatic sRGB->linear conversion applied, so that after the texel fetch, you can actually do calculations with it. To trigger this automatic conversion you need to pass the correct parameters when creating the texture using the glTexImage2D() function. Instead of using GL_RGB8 or GL_RGBA8, you specify the internal format as GL_SRGB8 or GL_SRGB8_ALPHA8. There are also compressed variants: GL_COMPRESSED_SRGB and others.

Be careful that you do not use sRGB textures for content that is not in sRGB. If the content is linear, like maybe a noise map, or a normal map, then you don't want OpenGL meddling with that content by doing a sRGB to Linear conversion step. This kind of data needs to be in a texture with linear colour encoding.

Lastly, when creating mip maps for sRGB, you need to be careful.

sRGB versus Linear Colour Space

I keep screwing up my colour spaces, so I forced myself to write down the rationale behind it. A lot of it comes from Tom Forsyth.

CRT monitors respond non-linearly to the signal you drive it with. If you send it value 0.5 you get less than half the brightness (photons) of a pixel with a 1.0 value. This means, you cannot do light calculations in sRGB space. You need to do them in a linear space.

Once you have calculated the light for your rendered image, you need to send it to the monitor. LCD monitors are made to respond the same way as the old CRT monitors. So the values you send to your framebuffer will end up producing too few photons (too dark.)

To account for this, you need to convert your rendered image from linear colour space to sRGB colour space. This means that all dark pixels need to be brightened up. One way to do this, which avoids manual conversion, is to have OpenGL do this for you. You create a framebuffer that is sRGB capable. With SDL2 you do this with the SDL_GL_FRAMEBUFFER_SRGB_CAPABLE flag to SDL_GL_SetAttribute() function. In iOS you can use kEAGLColorFormatSRGBA8 drawable property of the CAEAGLLayer.

Once you have this special framebuffer, you tell OpenGL Core Profile that you want the conversion to happen. To do this, you use glEnable( GL_FRAMEBUFFER_SRGB );

Note that OpenGL ES3 does not have this glEnable flag. If the ES3 framebuffer is sRGB capable, the conversion is always enabled.

When my renderer does the lighting calculations, it will work in a linear colour space. After rendering, it would produce this linear image:

For proper display on a monitor, we need to account for the monitor's response curve, so we change it into the sRGB colour space. After conversion, the dark colours are brighter:

Yes, much brighter! But hey! What's up with those ugly colour bands? Unfortunately, by converting the values into sRGB, we lose a lot of precision, which means that 8-bit colour channels are no longer adequate. In 8-bits, the three darkest linear values are 0x00, 0x01 and 0x02. After converting these values to sRGB, they are mapped to 0x00, 0x0c and 0x15. Let that sink in... there is a gap of "1" between linear colours 0x00 and 0x01, but a gap of "12" between corresponding sRGB neighbours.

So when we convert from linear to sRGB, we should never convert from 8bit linear to 8bit sRGB. Instead, we convert using floating point linear values. If OpenGL is rendering to a sRGB capable framebuffer, it just needs to read from floating point textures. In my game, the ray tracer now renders to a floating point texture. This texture is then put on a full screen quad onto the sRGB framebuffer, resulting in a correct image:

And that's it for this installment, people. In the future I could perhaps gain more precision by rendering to a framebuffer with 10 bit channels. But for now this is good enough.

Please see part two of this blog post series where I explain what you need to do if you sample textures in your shader and want to do light calculations on that.

Tuesday, September 26, 2017

vtune permissions

Note to self: before running vtune, do:

echo 0 | sudo tee /proc/sys/kernel/yama/ptrace_scope
sudo chmod 755 /sys/kernel/debug
sudo chown -R bram:bram /sys/kernel/debug/tracing

Saturday, August 26, 2017

Linear filtering of masked PNG images.

If you render your RGBA sprites in OpenGL using...

glBlendFunc( GL_SRC_ALPHA, GL_ONE_MINUS_SRC_ALPHA )
and you use GL_LINEAR filtering, then you may see black borders around your sprite edges.

The reason for the pixel artefacts on the border (they can be white too, or another colour) is that the linear sampling causes incorrect R/G/B to be summed. If one of the samples falls on a zero-alpha pixel, then that pixel's RGB colour gets weighed into the average, even though it is not visible.

This is a common pitfall in sprite rendering. The answer given on the stackexchange question is the correct one: you should use pre-multiplied alpha textures, and use instead:

glBlendFunc( GL_ONE, GL_ONE_MINUS_SRC_ALPHA )

The downside of this is that PNGs are — per specification — non pre multiplied. And Inkscape can only create PNGs, not TIFFs which would support pre-multiplied alpha. Also, stb_image lacks TIFF support too. So how to solve this by keeping PNG as the source material?

The trick is to have the proper background colour set for pixels that have alpha 0 (fully transparent.) If you know that you will be blitting these sprites onto a white background, then these masked out pixels should be value ff/ff/ff/00. If you know that you will be blitting these sprites onto a red background instead, use value ff/00/00/00 instead.

This is all good and well, but software (like Cairo and Inkscape) often mistreat alpha-zero pixels. Cairo sets them all to 00/00/00/00 for instance, even though there may be colour information in the fully transparent pixels. This means you cannot anticipate the colour of the target buffer, as the masked out pixels get a black colour. In my code, I have my texture loader swap out the alpha-0 pixels with a new RGB value, that matches the background against which the sprites are rendered. Note that this solution results in lower quality than pre-multiplied alpha sprites, but does have the advantage that it is less of a hassle.

Above left, you can see the effect of having the wrong colour (black) for fully transparent pixels. On the image on the right, you see the same compositing, but where the sprite has its transparent pixel colour set to white.

My fellow game-dev Nick, from Slick Entertainment fame, suggested another approach of bleeding out the colour value into the transparent pixels. That makes the sprite material a little more versatile, as you can render them against any colour background. I think it does give a slightly less correct result though, for the case where you do know the background colour and prepare for that.

Wednesday, August 23, 2017

Match 3

I decided to challenge myself in writing a quick and dirty Match-3 game. Not sure, how I came up with the theme, but it occurred to me that Smileys with facial feature permutations would make for interesting content.

I spent a full day on art, using Inkscape and OpenClipArt. A big time saver is the Inkscape feature that lets you render a specified object from the command line, so I don't have to wrestle with the GUI to do all the exporting.

The next day was spent coding. The game is written in a C-Style C++, on top of my own engine with the help of SDL2. I'm happy to report that I had the basics working in only a day: you can swap Smileys, and after matching, the Smileys above fall down, and are replenished. No scoring yet, no sound, no visual effects. But I did put in a very cute feature for hints: All Smileys will look in the direction of a smiley you could swap for a match. I think that's a cute touch.

My matching mechanism is quite novel too, I think. Instead of simply matching up a colour or shape, you need to match up one of the facial features. So three Smileys with the same glasses will match up. So do three Smileys with the same hair. Or three Smileys with the same moustache/beard.

I found that this feature matching takes more mental effort than traditional colour matching. Is that a good thing or a bad thing? On one hand, it makes for less relaxing gameplay. On the other hand, it seems a more intense training for your mind. So it's a trade-off.

I am happy with the visual appeal of the board though. A varied collection of Smileys makes for a happy sight.

Saturday, August 5, 2017

Assert your assumptions.

A lot of software bugs are caused by the following scenario: The programmer assumed a certain situation and wrote code that would rely on this assumption. Very often, these mental assumptions are never made explicit, and live in the programmer's mind only. A standard weapon against these bugs in the arsenal of the coder is the assertion.

When working in teams I would often argue for the use of asserts in production code, to the astonishment of my colleagues. The most frequent objection to this would be the performance impact. However, the 98% of your code that is high level will never show a perceivable performance impact from asserts. The remaining 2% you just disable the asserts in non-debug builds. The inner loop of the physics solver, the inner loop of the collider, the inner loop of the path planner. Sure, leave them out there. For all other code? Ship your product with asserts! You'll be amazed at what gets triggered.

To take the controversy a small step further: I also firmly believe in making the asserts user-facing. Let's take Android apps for instance... instead of having Android report "Foo stopped working" I prefer to show a dialog with the assertion that failed, the file name and line nr. By doing this you can leverage your customer base to improve your app's stability. A certain user may detect the pattern: "Every time I do X after doing Y, I get a crash with message Z." Exactly the information the developer needs to fix the bug!

And just for good measure, (or is it overkill?) I took it further again: and sometimes will even show callstacks to users. For instance, a steam user is quickly able to screencapture and post it on steam, or email it to the dev. So much valuable info.

So last month, I was noticing crashes reported by Google Play on my Android app. And not always will users contact you with the crash report, so I even with pulling in the user for crash reports, the right information would not always reach me. One solution is to adopt a heavyweight framework to do these reports for me. Link to an analytics framework. But it's possible to make a very lightweight solution yourself.

I was interested in the assert message only. No need for user info, device info, anything. Just the assert message with source code line number. And this is very small data. Smaller than an UDP packet!

So I coded a minimalistic assert report server to run on Amazon's EC2. Just a few lines of Python code, where a socketserver.UDPServer prints out the datagrams it receives.

Client side, it is a little bit more code. Mine is in C, as I make NDK based Android Apps, but in Java it is even simpler. This slightly verbose C code will do the trick to open a socket and send a single datagram to my assert report server.

I am happy to report the assert report server is doing its job, and helps me to get on top of the crashes in my game. For future improvement, I should probably add an app version number to the assert message, so I will know if it is an old issue or not. Thank you for reading, and let me know what you think of assertions, and if you run assertions in your production code or not.

Sunday, June 18, 2017

Android Revisited.

Every year or so, I come back to Android development. And often, quite a bit has changed. On top of that, I will have forgotten gotchas, and fall in the same trap twice. Hence, I need to document my process better. So here's another Android report.

I managed to hold out on IDEs altogether. I never used Eclipse, and always did ndk-build and ant on the command line. This time around, I have been forced to use Android Studio, as the google play game services are only updated for Android Studio builds. Android Studio is built on top of the Gradle build system. Gradle is a Java-only thing. For C++ it depends on either ndk-build (couldn't make it work with Android Studio) or CMake. So CMake it is now. You have to write a lot of CMakeLists.txt files for your game, and its dependencies. It is a hassle.

You can only add a single CMakeLists.txt to your Android project. So dependencies need to be included from a top level file. To do this, use: add_subdirectory( srcdir builddir )

Settings in your Gradle files are used to overwrite settings in your AndroidManifest.xml file.

Google Play Games is a mess as always. The latest version will crash on launch for me, so I had to downgrade it in my app's Gradle file.

The 'DEX' gets too large, so you need to selectively use Google Play Games dependencies like this:

dependencies {
    compile 'com.google.android.gms:play-services-auth:10.0.1'
    compile 'com.google.android.gms:play-services-nearby:10.0.1'
    compile 'com.google.android.gms:play-services-games:10.0.1'
}

If you target SDK level 21 then the Android Soft Keys will be hiding your app's content. For proper sizing, switch to targetSdk 19 instead.

After changing dependencies in your app's Gradle file, you need to do a clean, otherwise conflicts can arise, like duplicate definitions.

To link against a pre-built library, e.g. the Google provided gpg-cpp-sdk library, use the following CMake syntax:

add_library( gpg
             STATIC
             IMPORTED
)
set_target_properties( gpg
  PROPERTIES IMPORTED_LOCATION
  $ENV{HOME}/src/gpg-cpp-sdk/android/lib/gnustl/${ANDROID_ABI}/libgpg.a )

There is something wrong with the arm64-v8a build of Google Play Games gpg.a static library.

Wednesday, April 19, 2017

Real Time Ray Tracing for games.

In 2015, I've been tinkering with a real-time photon mapper to do Global Illumination for simple voxel worlds. Recently, I thought there should be more I could do with this idea.

So my Real Time Ray Tracing experiments are back, but with a twist. The minimalistic voxel world was a little too minimalistic. And it couldn't be much more detailed if I were to keep a 60 FPS target. So something had to give.

This time, I have dropped the Global Illumination feature, and no longer compute indirect light. Instead, I just fire one primary ray, and one shadow ray for each pixel in the projection. Granted, this does not give you much advantage in quality over rasterizing. But it does give nice crisp shadows, that can be cast from a local light, casting shadows in all directions.

To have a little more detail than simple voxel models, I went with AABB primitives. To avoid confusion: Normally AABBs are used in ray tracing for spatial indexing. In my project, however, I use the AABBs are the geometric primitives. They are more efficient than voxels, as large blocks and planes only need a single AABB primitive.

I do use spatial indexing to cull primitives though, but for this I use a simple voxel grid. In each grid cell, I have an instance of a primitive model. These primitive models are packed up as SIMD friendly sets of 8 AABBs in SoA form. Using 8-way SIMD, a single set of 8 AABBs are intersection-tested against a ray, in just a few instructions.

Target platform is AVX2 equipped CPUs, and it's currently running on GNU/Linux and MacOS. It's running close to 60Hz on a 4-core Haswell, at the expense of loud fans running, unfortunately.

Game Play is yet to be determined. Post your ideas in the comments. Thanks!

Saturday, March 4, 2017

The Little Bike That Could

So, I released a game yesterday. You can grab a free copy of The Little Bike That Could over at the itch.io site.

I made this over the course of one month, using the same custom game engine that I use for all my games. I had tremendous fun creating it.

Bicycle dynamics are so fascinating. It's a lot more involved than it appears to be at first glance. As a matter of fact, scientists had a really hard time determining where a bicycle's stability comes from. It turns out it is not caused by gyroscopic effect of the wheels.

It's pretty amazing that humans can cycle at all, as the process is so much different than it appears. For starters... imagine your self riding in a straight line on a bicycle. You want to make a left turn. What do you do with the handlebar?

If you answered: for a left turn, you turn the handlebar left... No, that is not what happens, surprisingly! Instead, you turn the handlebar in the opposite direction (called counter steering.) So you turn them right, which causes the bike to fall (lean) to the left. Only now, do you turn the handle bars to the left, to stop the fall to the left. This maintains the left-lean, and causes a left turn.

To stop the left-lean, you briefly steer further left which brings the bike upright again, and thereby ending the turn.

How remarkable is that? To start a left turn, you first steer right. To end a left turn, you steer left. As a child, our brain somehow is trained on this behaviour, and for the rest of our lives, it enables us to ride and steer a bicycle.

So I made a scientifically valid physics simulation for a bicycle. The player will choose a lean angle (to left or right) and then the computer will turn the handlebar to reach a desired lean-angle, causing the turn. I also added independent controls for rear and front brakes. This enables rear-wheel slides and front wheel stoppies. I created 10 levels with different challenges.

It's hard to really explain the game play, and others do a much better job of it. So allow me to introduce Iwan who played my game and made an excellent video about it.

Wednesday, March 1, 2017

The alternate universe without a computer mouse.

Consider the de facto standard user interface for computers and computer software. It is what we call the Graphical User Interface, or GUI. Comprised of a mouse cursor and windows, sliders, buttons, scrollbars and such.

I remember seeing my first computer mouse on a trade show. I'm going to venture that it was a Macintosh mouse. And it seemed magical to me. All I knew was 8-bit micros from Sinclair, Commodore, Acorn and the like. And suddenly there was this element on the screen that somehow was moved in sync with the movement of a little device. I seemed from the future!

The computer mouse may have been popularized by Macintosh, but its way was paved by Xerox Parc.

Personally, I'm more at home with command-line interfaces, with text based commands. As I've put it earlier: How reproducible is a mouse click? I use the Visual Studio IDE to port my games to windows. But because I use it so intermittently, I tend to forget my work flow. Where do I click, in which sub-sub-sub-menu to solve this issue with the compilation? I spent too much time wrestling with the GUI, wishing I was back in the command line environment with Makefile, as I do under Linux. If I need to reproduce something, I can just examine, and re-run the script.

While taking a shower, a thought struck me: what if the GUI was never popularized, or even invented? What if the text based interface, on a command line, would have persisted from the 70s into 2016. Let's visit this alternate universe, where the computer mouse, and the GUI, never evolved.

What would this alternate universe look like? I'm going to make a bold statement here: I think it would have been more technologically advanced than our current society.

Without a computer mouse, and without the GUI, we would still have an Internet. And we would still be ordering pizzas over the Internet. Just not with clicking buttons, but by typing in a command:

$ order-food -restaurant=marios -cheese=gorgonzola -meat=proscuitto -size=m

...or something similar.

The real kicker here, is that all these internet-based services would be text based, thus so much easier to extend and compose into more complex services. Maybe in a script, you want to combine the pizza-order with another command send to your fridge to chill the wine. If there is a text based API for service A, and one for service B, anyone (not just programmers working for the corporations behind A and B) would be capable of layering new services on top of these. No source-code of the web-sites would be needed. Extending a GUI based application typically cannot be done with no access to the source code. Even if source code is available, it is pretty hard. Extending a command line based application is much easier, and does not require source code. We could invoke services in scripts, sequence them, layer them, schedule them, whatever we desire.

This means that in our alternate universe, software applications will be far easier to extend. Developers can build on top of what others have made. Being able to extend third party GUI applications tends to be impossible, or at the very least hard, and would require things like plug-in infrastructures, and SDKs. Of the gazillion services available on the Internet today, very few are customizable, extensible. In our universe we spend a lot more time reimplementing the 'full stack' over and over again, instead of building on top of what others have made.

To conclude, I think the invention of the computer mouse was a curse, that just looked like a blessing. Sure, it may make the life of creatives easier. Producing digital art is so much easier with it. But in terms of computer technology, I fear that we are poorer for it, not richer. The GUI killed the command line, and that may very well not have been a good thing.

Did the computer mouse doom the technological progress in our society?

Saturday, February 11, 2017

The Little Bike That Could.

I am announcing my latest indie title, which is currently under development: "The Little Bike That Could." Like many of my previous titles, it comes with an exceptional physics simulation. It's been fun implementing and tweaking it. Wheelies, Stoppies, Slides and even loopings on a half-pipe are possible.

It is currently implemented for use with a gamepad on linux. The initial release will probably be on the ich.io portal, and after that I may experiment with phone-tilt control. So far, I've designed and implemented 6 different game levels, the last of which is fiendishly difficult.

If you want to follow the progress of this game, or participate in early testing, join the Google+ community for it.

Tuesday, January 3, 2017

New windows install

I've reinstalled windows on my PC, going to Windows 10. Here's a list of things to do on a new install:

  • Expand the explorer 'ribbon' to set the 'View' properties on your local drive. This is needed if you want to see file extensions.
  • Installed Visual Studio 2015
  • Installed Sys Internals Process Monitor.
  • Installed git for windows, which comes with the great git bash, that lets you do UNIX on windows.
  • Set Google as Default Search.
  • Using a git shell, make a new RSA key using 'ssh-keygen.exe -t rsa' command. Paste the public key in GitHub.com site's settings.
  • Set privacy options. Settings -> Update & security -> Advanced Options -> Privacy Settings. Switch everything off here. Note that windows will sometimes set them all back 'on' after a windows update. Sneaky if you ask me.

Sunday, January 1, 2017

2016 totals

So, The Little Crane That Could is holding stable on Android, but dropping on other platforms. Here are the 2016 results (Number of free Downloads.)

2016 2015 2014 2013 2012 2011
iOS 416K 630K 1300K 3199K 3454K 1550K
Android 1515K 1525K 825K 1579K 1656K -
Mac 10K 20K 30K 53K 81K -
OUYA - 0K 4K 15K - -
Kindle 48K 52K 46K 95K - -
Rasp Pi - ? ? 6K - -