Friday, December 16, 2022

The $8 Linux computer (part 2.)

Caveat Emptor! At the time of writing, ethernet, wifi and SD-Card are not working. It's good to realize this before jumping into this.

Things have improved a little, since writing PART 1 of my experience. Instead of a patched bflb-mcu-tool to flash, it is now possible to use a modified picoprobe [DOWNLOAD HERE] with the Dev Cube flashing tool.

Also, there is a patch for the PIN definitions so that we can capture the UART of the D1 core (which is a T-HEAD C906) on pins GPIO17/GPIO16.

With the fixed pin definitions we can hook up a USB to UART dongle, like the CH340G, to the second UART as shown below.

In this picture, the red dongle is to capture the output from the linux console running on the T-HEAD C906 core. The pink dongle is to program the Ox64. Both of these need to be connected to your PC. The Ox64 itself needs no connection to the PC, other than a power feed into the Micro-USB.

So, once we wired this all up, flashed to binaries, what do we get?

We get root!

And that's after booting in a blistering 0.22 seconds!

Full boot log.

I love Linux on a diet. So mean and lean.

Next up: Can we get networking?

Thursday, December 15, 2022

The $8 linux computer (part 1.)

Yes, you read that right... for $8 you can run linux on a RISC-V computer. And not just a stripped down kernel without an MMU. No, the Ox64 comes with capable RISC-V cores. Heck, and not just one core, but three cores (all different.) Exciting times!

Caveat Emptor! At the time of writing, ethernet, wifi and SD-Card are not working. It's good to realize this before jumping into this.

It looks like a microcontroller, but behaves like a UNIX machine. Sweet, or what? Getting it up and running, though, is far from trivial. There are so many hurdles to take!

Hurdle 1: You cannot program it using USB, like you would an Arduino, ESP32, Stamp-C3 or rPi Pico. Nope... this needs to be programmed via the UART TX/RX pins. In the picture above, you can see them hooked up to GPIO14 / GPIO15 and GND.

Hudle 2: The flashing tool Dev Cube will crash on launch when using Ubuntu on Wayland: you have to switch to Xorg instead.

$ ./BLDevCube-ubuntu 
Warning: Ignoring XDG_SESSION_TYPE=wayland on Gnome. Use QT_QPA_PLATFORM=wayland to run on Wayland anyway.
/usr/lib/x86_64-linux-gnu/gio/modules/libdconfsettings.so: undefined symbol: g_log_structured_standard
Failed to load module: /usr/lib/x86_64-linux-gnu/gio/modules/libdconfsettings.so
GLib-GIO-Message: Using the 'memory' GSettings backend.  Your settings will not be saved or shared with other applications.

(BLDevCube-ubuntu:54646): GLib-GIO-ERROR **: Settings schema 'org.gnome.settings-daemon.plugins.xsettings' does not contain a key named 'antialiasing'
Trace/breakpoint trap (core dumped)
  

So, UART programming then... fine, we'll just use one of those little CH340G dongles. I got one off Amazon, but it would not work... every time the handshake would fail in Dev Cube (hurdle 3).

Luckily, some people found out that you can program it with an RP2040 device, like the rPi Pico. I had a KB2040 from Adafruit lying around, so used that.

Which puts us at hurdle 4: How to turn a KB2040 into a serial bridge between PC and Ox64? Hook up GPIO-4 of the RP2040 to GPIO-15 of the Ox64. Hook up GPIO-5 of the RP2040 to GPIO-14 of the Ox64. Also, connect the grounds, of course. See below how to hook up for flashing the M0.\

Then we need to load our RP2040 with picoprobe which we can do by holding BOOT while powering up, and feeding it the uf2 file with picoprobe.

Ok, so now we can flash it then? Unfortunately, no, hurdle 5: DevCube is still not able to flash the Ox64, but we can use bflb-mcu-tool instead.

Ok, but with bflb-mcu-tool, we are all set! Are we? Introducing hurdle 6: we need to modify the tool before it will work for us. This means stripping DTR and RTS stuff from the tool by editing the ~/.local/lib/python3.10/site-packages/bflb_mcu_tool/libs/bflb_interface_uart.py file. Here is my copy.

So with the Ox64 powered via MicroUSB, and the RP2040 connected to my PC using USB-C, I can finally flash something. For that, I took the low_load_bl808_m0.bin from the bl808 linux guide and flashed it with:

$ bflb-mcu-tool --chipname=bl808 --port=/dev/ttyACM2 --baudrate=2000000 --firmware=out/low_load_bl808_m0.bin
    

After which I now get output from my Ox64, via my KB2040 to my PC:

dynamic memory init success,heap size = 156 Kbyte 
E907 start...
mtimer clk:1000000
psram clk init ok!
    

Ok, a modest start, but the Ox64 is talking to my PC now! Yay! Come back to my blog at a later time to see if I will manage to run Linux on the Ox64! Because as I understand it, I also need to flash something to the D0 and then flash the actual OS as well.

UPDATE: Here is PART 2.

Saturday, April 30, 2022

TurboLEDz Voice Changer.

I've released the 6th product under the TurboLEDz name. This time it is a voice changer. It makes you sound like a bad asss, by doing real time FFT, frequency manupulation and iFFT to go back to the time domain. It's built with an I2S mic and I2S DAC/Amplifier. To make the μcontroller capable of keeping up with the samples, I've programmed it as multi-threaded, dual core. So if one core is busy doing math, the other is still available to do IO. And the cores will tag-team. One core for the even numbered chunks, the other core for the odd numbered chunks. It works really well, as you can see in the video.

Sunday, April 24, 2022

Super Capacitors

I bought three super capacitors from Adafruit, model DDLE2R5LGN701KAA5S. They are rated at 700 Farad at 2.5V. (They have very little stock left, at time of writing, so if you want them too, act quickly!)

If I place them in series, I will end up with 233 Farad at the very maximum of 7.5V. However, charging to the max 7.5V is dangerous: one of the capacitors can easily overcharge and explode, that way. Unless you balance the capacitors.

Balancing a capacitor bank is not trivial. But there seems to be an alternative, as offered by Patrick of EngineeringShock.

Patrick's advice is to charge the capacitors to 80% of their nominal Voltage, so that even if there is a mismatch in internal resistance between the capacitors in series, none of them will overcharge. I like this approach, as it is simpler, does not require extra circuitry, at the cost of lost capacitance.

So if we charge a 7.5V bank to 80%, we get a charging voltage of 6 Volts. Let's make that our target. When we have have our bank charged to 6V, we can feed that into a voltage regulator, and as the bank drains to 3.3V, we should be able to ride from 6V to 3.3V and run a μcontroller off that, or some other low-power electronics.

And this leads me to my next objective: how to generate a steady 6V charging voltage? I would like to use solar panels for this. So let's dive into photovoltaics.

Reading the specification of a PV panel, there is the nominal voltage, which we can't really rely on. Then there is the Voc (Open Circuit Voltage) which we will measure if there is no current flowing. And also the Max Power Voltage, which is lower.

I need to read up on how to make sure that a photovoltaic panel output a steady 6V, and never any higher, at a tight tolerance. PV panels typically use charge controllers for that, but I want something simple. Maybe an opamp?

UPDATE

I am taking a different approach. I've decided to charge the capacitors in parallel, not in series, at a steady 2.5V.

To achieve this, I take input from a solar panel (with wildly varying voltage, and current) and convert that with a buck-converter to 2.5V that can be used to charge the capacitors.

I then use the capacitors as input for a boost-converter that brings a varying low voltage (It is only 2.5V when fully charged, and they discharge linearly) to a steady 3.3V. This I can then use in a client circuit, typically a μcontroller with some peripherals attached.

Wednesday, April 13, 2022

Lychee RV 86

Just for the heck of it, I am test-driving a RISCV Linux SBC called the Sipeed Lychee RV 86.

When I plugged it in, nothing happened. No console ouput on the USB tty, nothing on the screen. It turns out there is no software loaded on it: the flash memory slot is empty. So you need to provide your own storage, and own OS.

First attempt is with a "debian-minimal" install.

# dd if=debian-minimal-licheerv.img of=/dev/sdb bs=32K
134272+0 records in
134272+0 records out
4399824896 bytes (4.4 GB, 4.1 GiB) copied, 248.155 s, 17.7 MB/s

Those were the write speeds to my "Sandisk Extreme PLUS." Hmm... that does not seem to be an extreme speed, to me. It has a U3 designation. Oh well. UPDATE: Lexar x1000 was even worse: 15.7 MB/s and the write speed slows down, as you write more. Remind me never to buy Lexar SD cards again.

And it works! With the card inserted, I now get a login prompt on ttyUSB0 in 32 seconds. Not bad at all.

Somehow, it takes a long time for the Ethernet device to show up with ifconfig command? When it does, ifup usb0 is not working: ifup: unknown interface usb0

When I make usb0 interface known, the dhcp client will receive no offers, unfortunately. Despite the Ethernet light blinking, so there is network activity.

UPDATE

I have been able to work around the need for a proprietary MSWindows tool to use the Lichee RV disk images. With the OpenixCard tool, you can extract a normal image, that you can write with dd to an SDCARD.

$ file ~/Downloads/LicheeRV_Debian_86_480p.img   
/home/bram/Downloads/LicheeRV_Debian_86_480p.img: data
./OpenixCard -i ~/Downloads/LicheeRV_Debian_86_480p.img -d
...
$ file /home/bram/Downloads/LicheeRV_Debian_86_480p.img.dump.out/LicheeRV_Debian_86_480p.img 
/home/bram/Downloads/LicheeRV_Debian_86_480p.img.dump.out/LicheeRV_Debian_86_480p.img: DOS/MBR boot sector; partition 1 : ID=0xc, start-CHS (0x2,35,2), end-CHS (0x2,163,1), startsector 34336, 8064 sectors; partition 2 : ID=0xee, start-CHS (0x0,0,2), end-CHS (0x0,33,1), startsector 1, 2079 sectors
$ sudo dd if=/home/bram/Downloads/LicheeRV_Debian_86_480p.img.dump.out/LicheeRV_Debian_86_480p.img of=/dev/sdb bs=1M
8237+1 records in
8237+1 records out
8637726720 bytes (8.6 GB, 8.0 GiB) copied, 435.776 s, 19.8 MB/s

UPDATE

The Debian image works great. I removed all X11 stuff, and will just use fb0.

I noticed that eth0 mac address is randomized at each boot, so I had to create an entry in /etc/network/if-pre-up file:

#!/bin/sh

IFCONFIG=/sbin/ifconfig

if [ ! -x $IFCONFIG ]; then
        exit 0
fi

if [ "$IFACE" = eth0 ]; then
        $IFCONFIG $IFACE hw ether XX:XX:XX:XX:XX:XX
fi
  

UPDATE

To set the timezone: $ timedatectl set-timezone America/Vancouver

If not using wifi, it is probably a good idea to remove xr829 from /etc/modules file.

I have been removing a lot of packages, trying to get a minimal install. To aide this effort, I decided to graph the dependencies, to see which cuts I can make in the dependency chains.

UPDATE

The D1 CPU is RV64IMAFDCVU which means it does: INTEGER MUL/DIV, Atomic, SP FP, DP FP, Compressed Instructions, Vector Operations, User.

Sadly, it has no conditional move operations.

UPDATE

Tyring to build a new kernel for this, using these instructions. Oof! getting the linux kernel source with git history... 5.2GByte. These sizes of these things are getting out of hand.

Desk-side Stock Ticker by TurboLEDz.

TurboLEDz has released another product: the Desk-side Stock Ticker. It connects to WiFi with WPS, and automatically retrieves stock quotes from the Internet.

Saturday, March 19, 2022

Newest member of the TurboLEDz family: the CPU Odometer!

A CPU does not wear down with use like a car engine does. Hence, a car has an Odometer, and a CPU does not. I does not need one.

But, just because it doesn't need one, does not mean it cannot have one! I decided to make one. World.... please meet the TurboLEDz CPU Odometer.

It uses the turboledz daemon for Linux to keep track of the jiffies (centiseconds) that were spent computing, aggregated over all cores. If your computer is idling, it ticks very slowly. If your computer is pinning all cores at 100% it ticks up very fast. The odometer value is stored in between reboots on your system.

I am selling it on my tindie store.

Sunday, January 30, 2022

BSD

I'm doing my first exploration of BSD. After some struggles with the OpenBSD installer, I installed FreeBSD instead. Here as some findings.

You can install software from source in /usr/ports and to do that, you need the portsnap command to fetch the tree.

My 1280x768 monitor is used as a 640x480 console. I tried the following in /boot/loader.conf which did not work:

kern.vt.fb.default_mode="1280x768"
efi_max_resolution="1280x768"

I tried to use hidraw using this in loader.conf which also did not work for me:

hidraw_load="YES"
hw.hid.hidraw.debug="9"
hw.hid.hidbus.debug="99"
hw.usb.uhid.debug="99"

My 12th gen Intel machine cannot boot version 13 of BSD. Instead I need to use 14-CURRENT.

I could only get the installer for 14-CURRENT to run by installing a discrete Radeon GPU, which then let me set the BIOS option CSM enabled.

Friday, January 14, 2022

TurboLEDz

Game Studio Abraham Stolk Incorporated, has done a pivot. No games, for now, instead: consumer electronics.

Yep, I have refashioned myself as a electronics designer. And my new brand is TurboLEDz.

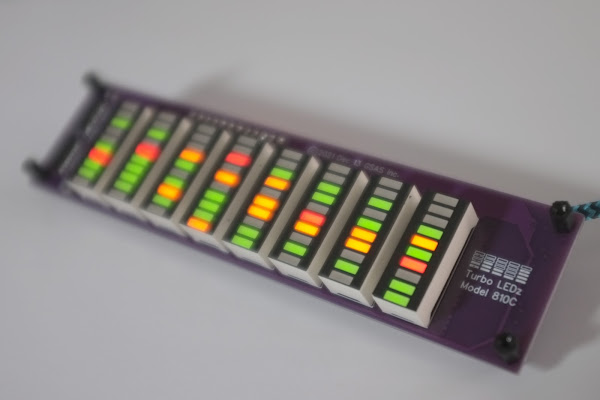
These devices will plug in your motherboard USB, and are to be mounted in your PC case. They will then display either the CPU load (Model88s) or the CPU Core Frequencies (Model810c) as a running graph.

You can buy them on my Tindie Store.